4.1.2.2 _Application authority popup_
In the application authority request form, when the "Add" button of the authority to be requested is clicked, the following popup screen is displayed: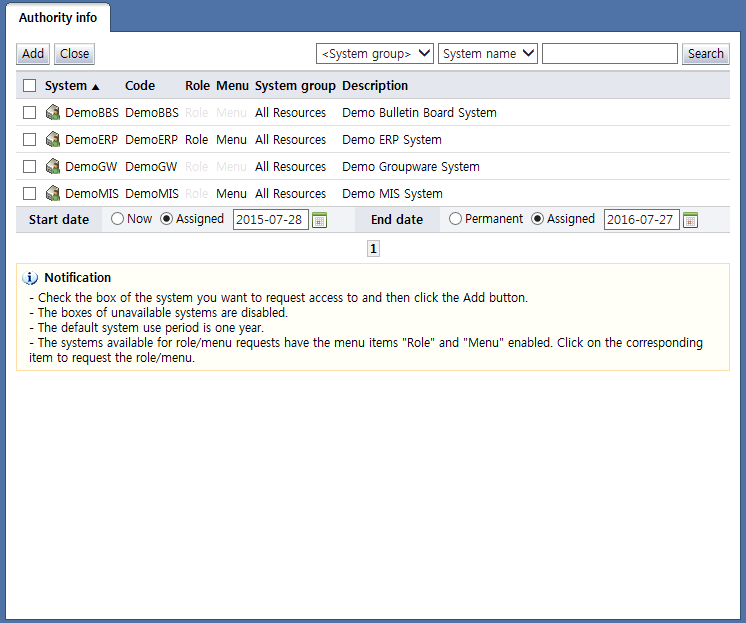
<Select authority popup>
On this popup screen, only systems where authorities (resource, role, menu) that can be requested by the user exist are shown in the list.
To add as an authority to be requested, select the checkbox for the system (resource) authority to be requested, select the system use period of the system (start date, end date), and then click the "Add" button.
Each of the items is described below.
Checkbox: Select the checkbox of the system item to be requested, and then click the "Add" button to add as an authority to be requested. For systems for which system (resource) authorities cannot be requested, the checkbox is disabled.
System: Displays the system name
Code: Displays the system code
Role: Brings up the screen for the list of requestable roles of the system. Enabled if roles exist in the system.
Menu: Brings up the screen for the list of requestable menus in the system. Enabled if menus exist in the system.
System group: The system group where the system belongs is displayed.
Description: A description of the system is displayed.
The buttons are explained below.
Add: Adds the selected system (resources) as an authority to be requested
Close: Closes the popup screen
Search: Shows the authorities that can be requested with the selected search conditions
The following is the screen shown when an enabled "role" is selected from the list of requestable systems:
<List of requestable roles of a particular system>
Here, a list of requestable roles in the system is shown.
To add as an authority to be requested, select the checkbox for the role to be requested, select the use period of the role (start date, end date), and then click the "Add" button.
Each of the items is described below.
Checkbox: Select the checkbox of the role item to be requested and click the "Add" button to add as an authority to be requested.
Role: Displays the role name
Code: Displays the code name
Parent name: Displays the parent name of the role. In other words, the full path of the role is displayed.
Description: Displays a description of the role
The buttons are explained below.
List: Brings up the list of requestable systems
Add: Adds the selected role as an authority to be requested
Close: Closes the popup
Search: Shows the roles that can be requested with the selected search conditions
The following is the screen shown when an enabled "menu" is selected from the list of requestable systems: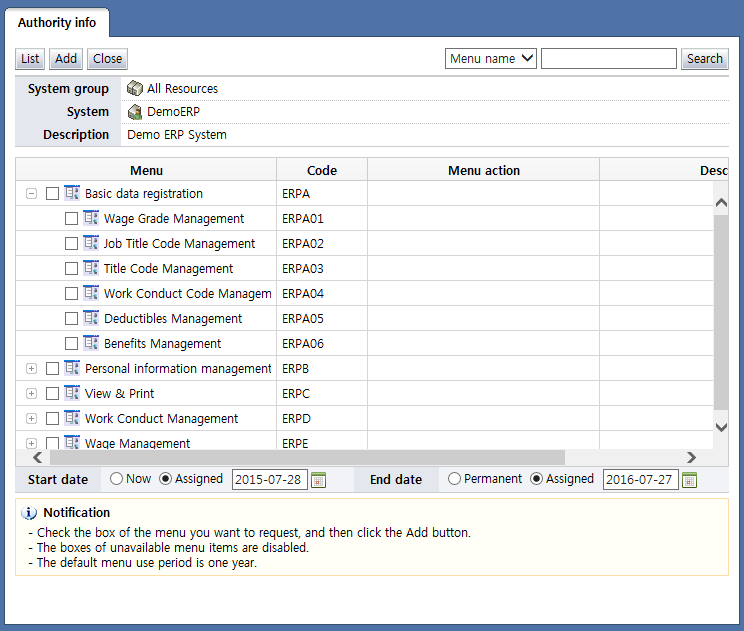
<List of requestable menus>
Here, the menu tree of the system is displayed. For requestable menus, the checkbox is enabled; for menus that are not requestable, the checkbox is disabled.
To add as an authority to be requested, select the checkbox for the menu to be requested, select the use period of the menu (start date, end date), and then click the "Add" button.
Each of the items is described below.

 :
is clicked to view the child menu of the menu.
is clicked to close the child menu of the menu.
:
is clicked to view the child menu of the menu.
is clicked to close the child menu of the menu.Checkbox: Select the checkbox of the role item to be requested and click the "Add" button to add as an authority to be requested.
Menu: Displays the menu name
Code: Displays the code name
Menu action: Displays the actions of the menu. In Menu action, the actions that can be handled in the menu can be selected. For actions as well, only requestable actions are enabled.
Description: Displays a description of the menu
The buttons are explained below.
List: Brings up the list of requestable systems
Add: Adds the selected menu as an authority to be requested
Close: Closes the popup
Search: Shows the menus that can be requested with the selected search conditions
When an authority to be requested is added as shown above, authorities are shown in the authority to be requested as shown in the following: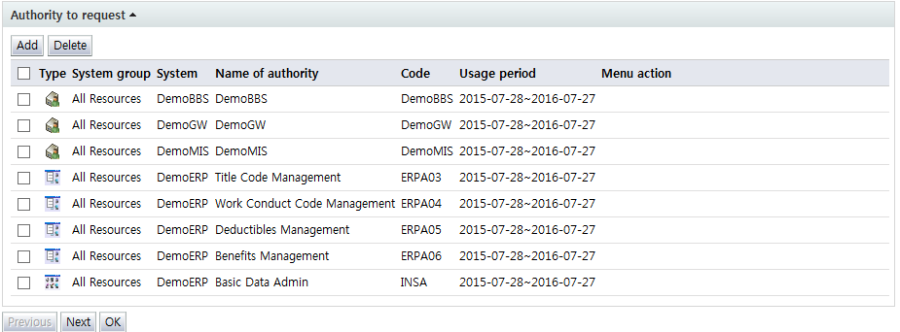
<authority to be requested>
Each of the items is described below.
Checkbox: Select the checkbox and click the "Delete" button to delete the request authority item.
Type: Displays the authority type
![]() : System (resource)
: System (resource)![]() : Role
: Role![]() : Menu
: Menu
System group: Displays the system group where the authority belongs
System: Displays the system name that has the authority
Name of authority: Displays authority name, such as system (resource) name, role name, and menu name
Code: The authority code is displayed.
Usage period: Displays the usage period of the authority to be requested
Menu action: If the type of the authority to be requested is menu, and a menu action exists, the menu action to be requested is displayed.
After adding all authorities to be requested, click the "Next" button to continue entering the details necessary for the request.
|
※ Note |
|
If the authorities are not shown on the request authority popup of the profile center, please check the following:
|